
I sort of accidentally took a break, but I needed to work on a few recipes to develop some more content. That and life was hitting really hard and I swear it was only August yesterday. How are we already in my favorite month?
One thing I really wanted to start doing in this blog is to add some basics. I think one of the coolest things about basic recipes is that they can vary so greatly between people. My friend’s go-to pie crust recipe used Crisco where mine uses butter only. My mom’s version of adobo is so different from my godmother’s version. Some people need to test a bunch of different versions of the same recipe before they find THE one for them. So this series are mine.
Also something a little different is that I’m trying to include more pictures of the steps. I used to be of the mind to just get through the recipe, but then I realized that I like to see what someone else is working with to check if mine is right when I’m doing it at home. This is another thing that’s slowing down recipe development and documentation because I have to ask Arc to stop and photograph me, or I instruct him while I photograph him. In this case, we tag teamed this cauliflower pizza crust.
Now on the to cooking notes and recipe…
I wrote this recipe out for a small crust, but what we made and photographed is more like a family size 16-inch crust, which is triple the recipe. Sometimes I only do double. The single version of this recipe can also very easily be splits into two smaller personal pies if you live with someone who’s a classic pepperoni only type and you’re a supreme with garlic sauce.
Cauliflower Pizza Crust
Makes 1 small pizza for 1-2 people
Ingredients
12 oz riced cauliflower (fresh, not frozen)*
1 egg
1 cup shredded mozzarella or vegan shreds
kosher salt
Equipment
Microwave safe bowl
Flour sack towel
Heat resistant gloves or chopsticks and tongs
Baking sheet
Parchment paper
1. Precook the cauliflower to prep the “dough”
Preheat your oven to 425 deg F. Line a large microwaveable bowl with a kitchen towel, and I mean the flour sack kind. Dump the bag of riced cauliflower into the towel lined bowl and cover with the extra parts of the towel hanging out of the bowl. Microwave for 4 minutes and let sit for about 5 minutes before retrieving it. This is a good time to prep your toppings and clean your kitchen sink while you wait for the cauliflower to cook.


Once the cauliflower has steamed in the towel, put on some heat resistant gloves (or use chopsticks and tongs, which is what I did before I got high heat grilling gloves) and squeeze as much liquid out of the cauliflower as possible. If you have the gloves and your sink is clean, you can also press the ball of cooked cauliflower against it for extra leverage!
I stress that this pre-cooking step should not be skipped. I used to not care and just toss the raw cauliflower with the rest of the ingredients to make the crust and it would work, but you couldn’t pick up slices. It also tasted a lot like cauliflower, and… DUH it is cauliflower. But if you’re trying to sneak more veggies in on yourself (or your not-so-veggie loving significant other), you want to do this pre-cook step. This was the game changer!
2. Prepare the “dough”


Once you’ve squeezed as much as you could squeeze out of the cauliflower, dump the cauliflower back into the bowl. Add the eggs and the cheese and season with kosher salt. You might want to keep it light on the salt if you’re going to use some salty ingredients to top your pizza, like pepperoni or sausage. If you’re feeling frisky, you can add dried oregano to the mix as well. Make sure to mix everything thoroughly so that you have a cohesive mixture of cauliflower, egg, and cheese.
3. Shape and cook the crust
Line a baking sheet with parchment paper. And only use parchment paper or a silcone baking liner, like Silpat. This mix will stick to foil or a plain baking sheet, so just save yourself the headache later and line your baking sheet.


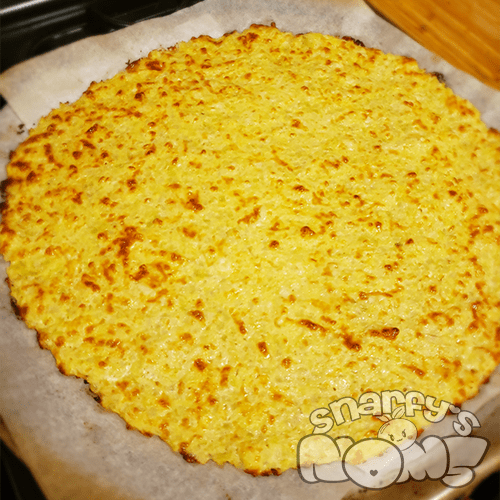
Transfer your dough mix to the lined baking sheet. Use one hand to help form a clean edge while pressing the mix into a thin even layer. You shouldn’t be able to see any holes or parchment through the mix, and you want to make sure the mix is as thin as possible. Put your crust in the center of your preheated oven. Bake for 15-18 minutes, or until the crust is cooked and slightly browned.


4. Toppings and the second cook
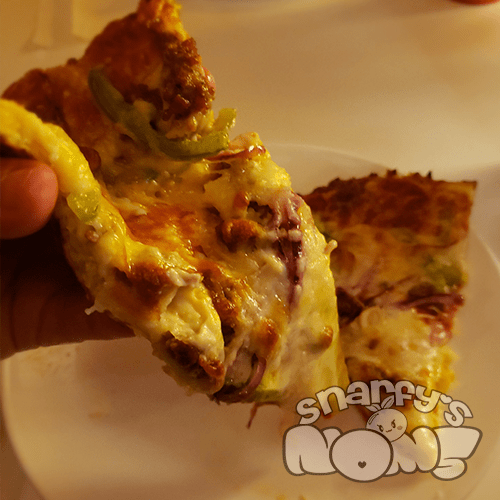
Before topping and re-baking, gently separate the crust from the parchment to make sure it will come free later on. Top as you normally would your favorite pizza. Our go to is garlic alfredo sauce with pepperoni, Italian sausage, red onion, bell pepper, and black olives. Put the pizza back in the oven and bake another 10-15 minutes until the cheese is bubbly and slightly browned.
Allow pizza to sit for a few minutes before slicing and eating. This allows the cheese to coagulate so the slices come out clean. If you aren’t sensitive to heat, you should be able to pick up a slice with your hands and eat like normal (albeit slightly floppy) pizza. Otherwise you’ll just have to fork it, but it’s still delicious this way too!
*I purchase pre-riced cauliflower in the produce section of my grocery store. Some stores also carry riced cauliflower in the frozen section, but I haven’t tested this recipe with frozen cauliflower. I imagine it would be similar, but since I haven’t tested it, I can’t speak to it. I have also purchased a whole head of cauliflower and riced it myself, but it is so much less mess to just buy it already done.
By the way, none of my links are affiliate links at this time. I occasionally provide links as examples only, but please use whichever products you are comfortable with.
